 CURV
CURV ED PIECING is one of my favorite characteristics of contemporary quilting. Traditional quilting relies almost completely on straight edge piecing but unlimited options open up when you begin to sew curves. Curves can be small wiggles or whole circles though often whole circles are made with four blocks of quarter circles (see quilt in photo). Curved may create layered colors in your design, as you see in one of my sunset quilts, or they may depict actual circles as shown in another quilt pictured here. Curves provide interest, color blending and depth to contemporary quilts.
There are many tutorials on the internet that show you how to sew curves, too many for me to mention here. Simple type ‘curved quilt piecing’ into your search engine and you will find a personal sewing lesson. Most simply you follow the steps below:
Take two fabrics, both with right side up.
Overlap one on the other so you have the wrong side of one fabric on top of the right side of the second fabric.
 Cut what I refer to as a “wallpaper cut”. In my photo example I did a simple curved line in just one direction.
Remove the fabric you cut off from the top and bottom and line up two pieces for sewing, allowing for a 1/4″ seam allowance.
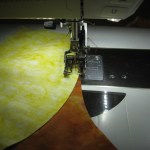
I’ve seen a variety of different tutorials that give you different ways to sew…check them out and decide what works for your machine and your skill. I have a Bernina 750 with some features that making sewing curves fun and easy such as a HOVER feature for my presser foot. Be sure your machine stops with the needle DOWN.
 I sew about 1/2″ at a time and then readjust the fabric so you are easing the top fabric into a match with the bottom fabric for sewing. Some people use a lot of pins and work the curve together before beginning to sew but I have found I like the sew, pause, adjust, sew, pause, adjust method the best.
When finished, press the seam and you have pieced a curve!
Check out my quilts in my Gallery and you will see that I use curved piecing A LOT!! Give it a try!


So that’s what a wallpaper cut is! Thank you
Sharon.
Thank you for sharing this technique. It is intimidating!!
I purchased some rulers for curve piecing but I don’t really need them, if I use this technique .
You may find you like curved piecing so much you won’t return to straight lines!!
I love your description and blog. Do you describe how you make overlapping colors such as for the forest?
I think I’ve done a blog but let me share some tips. You first need to cut the trees in Different sizes and lay them out for the design you want which will eventually be on top of the background. When I create the tree quilts I start at the top of the quilt piecing the sky and working thru mountains or hills to the forest background. The trees are all added slowly as the background is created. The trees furtherest in the background are added first, then more of the forest ground is added, then more trees. The trees are added by cutting them into the pieced background. I hope this helps.
That’s great. How do you get the curvy land shapes? I am just able to get a straight across shape. Combining two fabrics half way across has me puzzled. Thanks. Love what you do.
Most of my quilts are pieced with curved piecing. I’ve done several blogs about this, using a wall paper cut. I make the land shapes by just cutting the fabric in a curve. Check back over my blogs or Google ‘curved piecing for quilts’.